This morning, as I was looking over my upcoming lessons on analyzing webs I found out that the app I used to create drag and drop assignments is no more. Since before we get deeper into what happens in a food web when the population of an organism decreases or increases I need to be sure that my students are able to track the different food chains within a web, and we have been struggling with what is known in my classroom as "the arrows mean something", this was not a step I was willing to simply forgo. So I turned to the trusty internet for something already made. As I was inputting different search parameters I stumbled upon Matt Miller's "Creating moveable digital activities with Google Drawings + Slides". I watched the first part and, being a Google Drawing fan I went ahead and created my drawing, stacking multiples of the same text boxes as needed by simply copy/pasting them on top of each other and placing them as a stack on top of an "empty" box.
I felt rather pleased with myself and called my daughter to try it out. Dutifully she did, and immediately two super important things became evident:
1. I needed to be able to lock the background
After another round of searching and watching Matt's whole video, I found out that while you cannot lock the background on Google Drawing, you can set an image as a background on Google Slides.
2. I also needed to be able to "lock" the text the students were dragging so they could not modify it accidentally.
Instead of adding them as text boxes, I created the text and used the snipping tool to create them as images. While they can still be deleted as a "block" the content cannot be modified.
I am sharing the student template to give you an idea of what you can do.
I then started thinking, what else could we do with this? I love the idea of the drag and drop but also wanted this to be a little more challenging. Inspiration struck as I moved on to a different grade level, where I decided that students could use the traditional labeling assignment as a drag and drop that leads to a presentation. Using the same technique as before, but adding links to blank slides students could do more than just a simple labeling assignment.
For example, in this assignment where students will be asked to label a plant and an animal cell and use that as a springboard to create a presentation detailing organelle functions.
What do you think? What other uses of the drag and drop do you see yourself creating?
The response of my students to this whole idea has been very encouraging. They actually look forward to Boss Battle days, literally rushing to class to participate in what you and I would actually call a testing day. However, there were a couple of little nagging issues that my more hardcore gamers immediately asked for: Extra XP for "first hit" and/or for "first perfect hit". Apparently, this is a "thing", and while they were satisfied with my answer at the time "Don't know how to do that other than scouring the sheet, which I do not want to do. If you figure it out, we can implement it", it stayed in the back of my head.
A couple of days ago, I once again sat down to try to figure it out, and it finally crystallized.
- First hit: Easy, since you only need to bring up the first entry on the form
='Form Responses 1'!$B$2
- First perfect hit: This formula looks up the e-mail of the student Form Responses sheet (column B) and returns the value found in column C when it equals 10 (the perfect score for this Boss battle). Once it finds the first one, it stops.
These two formulas made the students happy since at least they now had the "bragging rights". The addition of extra XP for those two instances can be done manually, or by adding a "Perfect" sheet to your BossBattle (as in the example), where you again report those two values and input whatever XP you wish for them. You can then use the Vlookup function explained in my previous post to have Google sheets find the value for you. That formula in your leaderboard would look something like:
I now have to add those formulas to all my Boss Battles, but I know that it will be a nice surprise when we come back from break. What about you, any other tweaks to share?
I was intrigued by the idea, especially after a couple of messages back and forth with Jake and @dyerksjr1 revealed that even with the "must be editor of the document" limitation, it could work via Google Classroom using the create a copy for each student and insert "from Drive" options (link). So I set about finding out whether you could include links, change fonts, add images (not just emojis), etc. Two frustrating days later, it dawned on me that I've never seen these kinds of adjustments on Google's actual pop-ups, so while I still have hope that it perhaps can be done, I instead changed my focus to what I could use the pop-up idea for.
So let's start by referencing Jake's original post "Add a Popup Message to your Google Docs", where he provides step by step instructions on how to add the code to your document.
The code for a Google doc is:
function onOpen() {DocumentApp.getUi().alert(<head> "insert your message here" </head>)}
If you would like to add to Slides instead, you would use:
function onOpen() {SlidesApp.getUi().alert(<head> "insert your message here" </head>)}
and for Sheets, well:
function onOpen() {SpreadsheetApp.getUi().alert(<head> "insert your message here" </head>)}
With that out of the way, it is time to have some fun and think of ways of using it:
1. Reminders:
2. Provide links: Although the link itself will not work, students can always copy/paste it:
3. Give words of encouragement:
If you do not mind a little extra work, you can even provide individual pop-ups or even chose only a couple of random or carefully selected students for whom the pop-up appears.
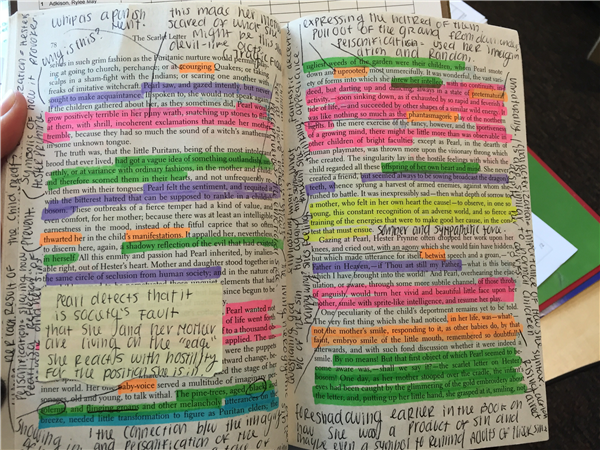
As many of you may have experienced in your own educational journey, at some point I was taught about annotating what I read. The mighty highlighter made its appearance in every school supply list my mother received, and much like you see above, I gleefully used it to mark pretty much everything I was allowed to. As the years progressed the highlighter slowly disappeared and the annotations instead made heavy use of the marvel of Post-Its which gave me the advantage of being able to write something along the text and not simply marking things that my young self considered "important".
At some point in my career as an educator, I was introduced to the idea of close reading, and with it came a whole new way of marking text that I was expected to teach my students. Colors and specific markings were the norm and while I am not against close reading or increasing student understanding of text (What is annotating and why is it an essential skill to close reading?), the idea of having my students have to follow a specific format and key made it seem more like busy work, akin to my highlighter overuse.
The questions I asked myself throughout the close reading professional development were:
After all of this, will the student ever go back and use all those notes for something other than answering a couple of questions?
Will they ever remember that that particular document had some important notes that could be used later for something else?
What about all the reading we now do online? Am I really going to print out all their research so they can use this?
What about using collaborative close reading, especially in my PBL classroom where students are often reading a relatively dense scientific text? Shouldn't there be a way for students to close read together?
All of these questions can be answered with just one "magical" digital annotation tool - Scrible. Let me explain...
A couple of years ago, I developed a project for my 6th graders on Climate Change. The idea was that the students would choose a topic from a list, interact with several digital resources from places like the EPA and the NCA and collaboratively develop a product to educate others about the impact of climate change. Par for the course, except that many of them were overwhelmed by the amount of reading and synthesizing they had to do. Add to that that they had to share their thoughts on the reading with each other and organize all of the information and ideas into one cohesive product, all the hallmarks of chaos leading to disengagement. That is when Scrible, a free tool, makes its entrance.
Scrible makes the possibility of collaborative digital annotations a reality! The only thing students have to do is create an account (using their district e-mail). Once that is done, a student can use the tool on any webpage sharing their thoughts right next to the text they highlight. If they create and share a permalink, they can also annotate collaboratively, which means other students can join a conversation about that digital text; this can take the form of questions, responses, comments and even links to other corroborating sources.
At first, students used the tool simply to remind themselves of the information, stating simply that "this information is important". However, as they progressed, and with some prodding on my part (adding cryptic replies such as "why?"), they started adding a more thorough commentary, and even inserting links that corroborated what they were reading. These annotations then allowed them not only to record their thinking but also to organize their thoughts in preparation for their project work. They served as reminders of key concepts and lateral readings they had done as they interacted with the resources. Since they were sharing the reading and annotating load, all the students were happy to add to what was being said instead of that solo "this is too much" mentality that we had before the use of the tool.
What is even more perfect, is that as long as you are logged on, the tool will keep track of the web pages you have visited and their annotations. This came into play for us when the students used pages they had annotated for the climate change project several months after the fact to support some of their building choices in their disaster-proof housing project during our human impacts unit.
However, the best indication that the tool worked for my students was when I discovered it being used, without prompting, by former students. When I asked them why, they shared that it made their work easier since they could talk to each other about what they were reading, saving them time and allowing for everyone to join even if they were not in the same room. That, in itself, is a win for me.
There are a couple of Scrible tutorials on Youtube in case you need help signing up and using it:
It is worth noting that you can use Scrible on pdf's and "published to the web" Google documents, saving you the time and cost of printing resources you may already have to share with students.
I invite you to start playing with Scrible and share a comment telling us how it went. Until next time.