Saturday, December 31, 2016

We don't need badges, or do we?


When I started my gamification journey, one of the sore spots, if you will, was the awarding of badges. On the one hand, I agree with the ideas in Daniel Pink's Drive and the overjustification effect, and which translates into "Badges ruining intrinsic motivation to learn". On the other hand, I have a gamer son, who keeps going back to specific games in his collection simply because he wants to get that elusive gold badge just so he can show it off in his profile. So which is it?

As I continued to ponder the answer to this question, I participated in a couple of workshops and PD that offered badges that could be "added to my profile". I was surprised by my own drive to complete the activities, not really for the sake of learning, but because I wanted to show off the badges I had. Badges were giving me a sense of accomplishment and encouraged me to persevere, even when I got bored! If badges were doing this for me, why was I being so reluctant to add them to my classroom?

I began exploring different ways that other educators have used badges and came up with two reasons that if addressed would make me re-think the whole badging issue.

First, if I were to include badges, I had to make sure that the badges represented real achievement. One of my concerns with badging is that it can simply become a sticker chart. The idea that everyone gets a badge simply for showing up or participating in an activity takes away the value of the badges. Let's face it if the students know that they will get a badge simply for filling in boxes in an assignment, will they put any effort into making sure that their answers are correct? Probably not. However, if they know that they will only get the badge if they get a high enough score, then they may feel that the badge has some value attached to it. Even better, let's say that they did not get a high score in the badge assignment(s) the first time around. Will knowing that they can re-work the assignment giving them more than one opportunity to earn the badge, motivate them to keep at it, even if they think it is boring or not worth their time? I think it will.

Now, if this is the case, then I knew that I needed to be able to make my own badges. There are several online tools that allow us to do that. ClassbadgesCredly and OpenBadges come to mind. However, I prefer to fully create my own simply using GoogleDraw and clearly explained here by Alice Keeler.

Second, the whole idea of badges for me is that they must be public. Students will want to know, not only if they have the badge, but also who else in the classroom has it. That gamer sense of competition and being able to showcase achievement adds value to the badge. The tools mentioned before for creating the badges, also allow students to log in and view their badges. Now this would require students to create an account and/or log in with accounts that the teacher creates. That, for me, was a no go, and although I toyed with the idea of creating my own system using GoogleSheets, I decided against it (simply due to time constraints), when I came across Flippity.net's Badge Tracker. With a few tweaks, this tool allowed me to import the data of my existing leaderboard, use my own badges and embed it in my webpage for public viewing. All around win!

For now, I have decided on three types of badges:

Leveled Badges: These symbolize achievement in on-going assignments. Students will earn these badges by scoring well on their weekly writings and reading assignments.

Project Badges: These badges represent the skills and knowledge gained in a specific unit of study within the scope of science and engineering curriculum. 

Commitment Badges: These are badges awarded for achievement outside the leveled and project badges. What I envision here is, for example, a "Digital Citizenship" badge or a "Creative Commons" badge. 

So, what do you think about adding badges to your gamified classroom? I would love to hear your ideas.

Wednesday, December 14, 2016

Formative Assessment Made Easy


Do you know where your students are? As you walk around the room today, can you state with some which students are ready to move on and which group do you need to pull for re-teaching? You know the answer lies in the use of formative assessments, but with all other things that pop up daily you may feel overwhelmed. If only there was a simple tool that would give you the necessary information...


GoFormative

With a few clicks, GoFormative allows you to create and share simple (and complex) assessments. You can use multiple-choice and true/false quick checks that are self-graded or add short-answer and "show your work" (where students upload images or draw answers). You can even provide feedback to the students as they answer in real-time. No waiting until they have all finished to gather data, allowing you to address minor misconceptions quickly. Best of all, absolutely free.


Flipgrid

This awesome tool allows your students to respond to your questions using video. You simply create a grid (i.e. post a question) and provide the link to your students. Your students can answer using any device they have, without having to create an account. Flipgrid can be used in lieu of traditional exit tickets, and it is much more fun to grade. Not free, but $65/year gives you unlimited questions and answers.


Socrative:

Socrative has been around for a while. This tool allows you to quickly assess your students through quizzes, quick question polls, exit tickets and space races (for those with a competitive edge or in a gamified environment). The tool can grade and provide you with visuals of the results making it easy to identify where each of your students is in their road to mastery.

What other tools do you have in your formative assessment toolkit? I would love to hear about them.

Sunday, September 4, 2016

Fines in a Gamified Classroom


Let me start by stating that I have two separate "but equally important" systems in my gamified classroom. The XP  system, which is tied to the students assignments (blog quests, mastery quests and PBL quests). In the XP system students are awarded initial points after submitting their work, and continue to gain XP as revisions are submitted. In true gaming style, one cannot lose XP. After all, once you have an experience you cannot undo it, you can only make it better. The XP system is shared out to students in my public leaderboards.

I also have a school currency system (we call them Patriot Bucks), which is tied to school and classroom behaviors, and stems from my school's PBIS. Students can earn Patriot Bucks at a staff member's discretion for things like picking up trash, participating in class, or basically any show of positive behavior. Students can use their Patriot Bucks to purchase items at the student store or enter them in weekly raffles. It is important to note that Patriot Bucks are a physical item (slips of blue paper, signed or stamped by the staff member who gave it out), and that no one, except for maybe the individual students, keeps track of them. This is what made it so easy to find a new use for them.

It all started a couple of weeks ago as I wrapping up of Back to School unit, which as in most classrooms involves teaching students the expectations, rules and procedures of my classroom. My students had just passed the Acceptable use Policy quiz, and were eager to get their hands on our classroom devices. I had taught/modeled how to take the devices out of the cart and how to put them away. I had explained how it was important that all devices be plugged (with their own plug) in order for all classes to have enough charge for the day, as well as how to make sure that each device was put in the correct slot. I even had students come up one by one and "show" the class just how to do it. Everything was going well until that first eager student picked up a "random" device (i.e. a device that was not assigned to him). The natural consequence for this is that the student would not have access to devices for at least that class period. But, I did not want to do that since that would mean that I would be the one to come up with something related to the activity, but that did not involve technology. The student in question suggested that he write a letter of apology promising to not do it again. It just so happened that I had just had a conversation with a fellow teacher about something she called the "opportunity log", where students write a reflection on a class misbehavior and promise to do better. I had shared with her that in my experience those almost never work. It is a forced apology, akin to a mother telling her children to "apologize to your brother for ____", only to repeat herself the next day and ask for another apology for the same behavior. I shared that with the student, asking him how many times he had apologized to a sibling without really meaning it. He sheepishly smiled, and stated that just that morning he had "apologized" to his sister, but he had no actual plans for "never doing it again".

At that moment, inspiration hit. I told him that in order to get his device he would have to pay a Patriot Buck fine. We agreed that 20 Patriot Bucks would be appropriate. He went back to his seat, carefully counted and came back to me with a proud look. He had just enough! He placed the "fine" on my desk and asked if he could go get his device. I simply thanked him and told him to get to work. The rest of the class exploded in questions about the "fine" system. For some reason they welcomed the addition of fines and saw it as a perfectly acceptable and fair way to overcome infractions. There were many questions about specifics, "What is the fine for not logging out? What about for forgetting to plug a computer?" It was the little things that bugged them as much as me that in their opinion should warrant a fine.

After much discussion, we ended up just having two categories of fines - minor infractions (20 Patriot Bucks) and major infractions (50 Patriot Bucks). Minor infractions include things like not plugging in a device, putting a device in the wrong slot, and taking someone else's device. Major infractions include things like off-task behavior or mishandling of the devices. I left myself some wiggle room, creating a third category that states "Fines for anything not mentioned before can be assigned at my sole discretion".

In a surprising turn of events, something else happened once the fines were in place. Students have begun to help each other avoid fines. Instead of simply walking away from unplugged devices (which of course still happen every once in a while), they take the time to plug them in for each other. I've overheard statements of,  "Dude, stop goofing off, that's a 50 PB fine!" This is already pretty cool, but there is more. A new student who did not have enough Patriot Bucks to pay for putting his device in the wrong slot, and who I was ready to excuse from the fine, saw his classmates (students he had just met), pool Patriot Bucks to pay his fine. No prompting at all, simply a spirit of cooperation and doing right by each other.

So far, this system is working beautifully, and I am wondering if you are using something similar. Do you have any words of wisdom to add? I would love to hear from you.


Monday, July 18, 2016

Web Tools to explore before the summer ends

Summer is coming to an end. As you start getting your teacher hat back on, and dreaming about your "perfect" classroom, you may want to look at some web-tools that could come in handy. Here are my favorite free or low cost summer discoveries:

Write-About: This site allows students to engage in high-interest writing for an authentic audience. Students browse through a collection of ideas, each one paired with an image, and write about them on the site itself. Students can even use the built-in voice recorder! Posts can be shared with the class or made publicly viewable so that registered students and teachers can comment on them. teachers can provide feedback on the writing and moderation tools are included. A yearly classroom plus subscription is around $40.00 USD allowing up to 250 students and unlimited posts. Want a closer look?

iPiccy: Similar, but less complicated than Photoshop, this is an image editing tool that allows users students to apply filters, add effects, crop or resize an image. All online.

EducaPlay: Create your own embeddable activities. From fill in the blanks and interactive maps to video quizzes and sentence jumbles, the possibilities are endless. You can also share activities, collections and search for content created by other teachers.  Free accounts allow you to create groups and see reports (a big bonus for data driven instruction). Watch how easy it is to create an activity in EducaPlay.

PrimaryAccess: A suite of free online tools that allows students and teachers to use primary source documents to complete meaningful and compelling learning activities with digital movies, storyboards, rebus stories and other online tools.


JustapoxJS: This Knight Lab tool allows user to tell stories by comparing two frames, including photos and gifs. Ideal for then/now stories that explain slow changes over time (growth of a city skyline, regrowth of a forest, etc.) or before/after stories that show the impact of single dramatic events (natural disasters, protests, wars, etc.). This is their own example using Google Earth's Images:


If none of these catch your fancy, maybe you will find something interesting in my growing collection:


Mrs. Garcia's Classroom Webtools, by mrsgarciaserrato

Friday, July 15, 2016

Pokemon Go in the classroom?


As I look around my neighborhood today, I cannot help but notice the bands of kids and teenagers walking around looking at their phones. Yes, Pokemon Go has hit my otherwise quiet street, and I immediately start thinking to a couple of weeks from now, when we get back to the classroom... I know the kids will come back from a summer of hunting Pokemon. I know they will be itching to talk about this or that amazing find. So, how can I harness that enthusiasm? What can I do to transform this "distraction" into some meaningful learning activities? Am I crazy for even thinking about it? Here goes:

Pokemon Go Math:


Pokemon caught are transferred into what is called a Pokedex. Clicking on the Pokedex, you can access data for individual Pokemons, including weight and height (in metric, Yay!) Students could use this information to determine things like, "If you were building a Pokemon dwelling, how many Squirtles would fit in an 64 square meter area?", the area needed to house all the Pokemon in their Pokedex, the height:weight ratio of unevolved to evolved Pokemon, or the ratio of "seen" vs. "capture" - does it vary by type or location? . You can even go as far as having students try to determine whether there is a proportional relationship between type of Pokemon and size.

The game also keeps records of all events in the Journal. The data gathered there could be used to figure out average Pidgey appearances for particular locations or times, or average out the number of Pokeballs given at Pokestops. Taking it one step further, they could also graph their Gym results, which has the added benefit (to the students) of helping them create the "best" team.


Pokemon Go Language Arts:


The game has the interesting feature of allowing users to take augmented reality pictures of "wild" Pokemon and placing them in the scene the camera is facing. Students can use these pictures to develop stories. Prompts could include things like "A day in the life of ...", or "When ____ took over the ____".


Pokemon Go Science: 


As part of a unit on biomes, students could use their knowledge of Pokemon types to develop habitats for specific types. This could also lead to lively discussions about why some Pokemons are more common in different places. What characteristics are shared by Ice Pokemon and the animals that inhabit the Tundra?

A study on the mechanisms of evolution could be followed by having students create scenarios that led to the traits observed in their favorite Pokemon.

On a more ambitious vein, you could have students develop a complete Pokemon utopic city, powered by electric Pokemon!

Pokemon Go Social Studies:


Many Pokestops and Gyms tend to be in historical landmarks.  Students could use these places as a basis for further research into the landmarks, or create virtual fieldtrips and advertisements encouraging others learn about those landmarks and/or visit them in pursuit of "Catching them All".


Any other ideas? I would love to hear all about them.

Wednesday, July 6, 2016

Chopped - An activity for the first days of school


The first day of school offers up many opportunities for us to define what our student's experience will be like for the remainder of the school year. Many of us spend this wonderful day asking students what name they prefer we use, going over classroom rules and expectations, passing out green sheets and having students look at our carefully crafted syllabus. The adventurous among us might even create a classroom quest to get students familiarized with the layout and having students look for different items, creating a classroom constitution or perhaps playing a round of "Find someone who...". These are all cool, and I guess important, but your students are either "listening" to you drone on, or participating half-heartedly. This year, I invite you to forego these tried and true activities for something more exciting, a Chopped design challenge.

Before the first day of school, prepare identical "baskets" of 3-5 mystery materials. These can include empty water bottles, paper towel tubes, cereal boxes, baggies of pom poms or beads, trinkets from the dollar store, etc. The more the mystery materials "don't go together", the better. You will need one mystery basket for each group of 3-4 students.

On the first day, assign  groups of 3-4 students randomly (using a count-off method or whatever you prefer), and distribute the mystery baskets. Then, in your best Ted Allen voice state:
"Welcome to Chopped. Your challenge - create a useful product from the mystery items hidden in each basket before time runs out. Every one of your mystery items must be used in some way. Also available to you, our maker items. When the bell rings (we have 10 minute bells), you will place your item in the judging table and clean up your space. During our next session you will present your product. Our distinguished judges will critique your work on usefulness and creativity. If your product doesn't cut it, you will lose the privilege of ____ for the remainder of the week ."
The maker items are any materials you have in the classroom. This may include glue, different types of paper and tape, cardboard, foam, etc. The privilege lost can be something like getting to choose seats or listening to music.

The student work time on this first day gives you the perfect opportunity to walk around learning student's names, conduct brief interviews and observing the class' dynamics.

On the second day, I provide students with a rubric to evaluate the products, and have each team present their product. Presentations on the second day allow students to introduce themselves to the class, and set the tone for peer evaluations which they will use for the remainder of the year. They also give you an insight into the students' personalities helping you create teams for future assignments.

As a follow up, you can hold a class discussion (or individual written reflection) centered around questions such as:

  • What worked well/did not work in your group?
  • How were decisions made in your group?
  • How did you organize yourselves?
  • What did you learn about yourself/your team members/your classmates during this activity?
  • If we were to do this again, what would you do the same/differently? Why?


What do you think? Isn't this a much more fun and engaging start of the school year?

Tuesday, June 28, 2016

Beyond the Leaderboard: Self-ranking charts


A couple of days ago, I talked about creating a multiple-class, self-ranking leaderboard. My students love the idea of being able to see where they rank, and compare themselves to one another, creating this competitive gaming environment that often leads them to perform and to keep working, simply to "outrank" one another. As I was updating my class website to include this new board, I started thinking about how to use the leaderboard as more than just a ranking system for the XP. Could I use it to inform students about how they are doing in different categories? Could I show the data in some way that would maintain the integrity of the leaderboard, but focus students' attention on opportunities for improvement as well? And almost as important, is there an easy way to do it; one that would not require much more than inputting values as the students grow? The answer turned out to be YES on all accounts.

Before I show you how, let me share the end products:

"I Need To Do More" chart


This first interactive chart, displays the totals for each XP category. As the year progresses, students can see how much each of the categories has impacted their XP totals. On their own, or with some help, they can decide to go back to assignments they may have missed or where they scored low XP and re-do/re-submit in order to up their total XP for that category. In my case, it could show an Aha moment akin to, "I have not done many of my blogs, if I do them now I can gain all those XP I missed".

"I Need To Do Better" chart


In this other format, the same data is displayed by average XP obtained in each category. When students see the data organized this way, they can quickly see areas where they can focus their efforts, to increase their standings.

The beauty of both of these charts is that they use the same Pivot Table I created for the self-ranking leaderboard, so not only do they update as soon as I input new values, they are also tied to the original ranking. The student order within the chart updates as well as they move up or down on the leaderboard, making it a "one-stop" responsive system that does not create more work for me to maintain or update.

The following video explains how to create the charts, and I am also sharing a template that you can use to draft your own.


Let the games begin!

Monday, June 27, 2016

Appsmash to Gamify - From Leaderboards to Quests


Although many of us agree that gamifying your classroom can provide benefits in terms of engagement and relevance for the students. Many of the teachers I have talked to have this idea that gamification is too hard, or that you can only do it by purchasing an app or some other tool, which may or may not limit what you can do. However, this is simply not true. With the myriad of free tools at our disposal and a little creativity, you can create your own gamified world for little to no money. Gamification is about creating a game-like experience, not about creating an actual game.

Before we go any further, take a peek at my "Island of AdVENTURE", where our ultimate goal is to take over the world. That is the simple storyline for my classroom. The benefit of such a broad and vague topic is that it will never be "done", and gaming elements can easily be added as they are needed. I talked about the decision to adopt a single storyline for all my classes in a previous post. If interested, you can visit Gamification Year 2 - The quest continues.

So, what was needed to create the Islands of AdVENTURE experience?

Game Website:  

If you have been here before, you know that my go to place for this is WIX, because it allows for ultimate flexibility in item placing, allowing you to embed practically anything you may wish to add. WIX is free to use, and gives you one place to create as many web sites and subpages within a site  as you need. On the game website itself, I like to add links to my blog, class calendar, and all of our classroom policies, procedures and even the green sheet. This gives the students a central place to go for everything related to the gamified classroom, and completely eliminates any "but I didn't know..." moments. These different documents are added as tabs, or in the case of the classroom management stuff, an interactive Thinglink image that gives access to all documents with a simple click.

Maps: 

This is the only item in my gamification arsenal that I paid for: Profantasy Campaign Cartographer. I could have used art from other sources and/or even used maps from Google Mapmaker, but creating my own allowed me utmost flexibility to include what I wanted, down to shaping the islands to represent grade levels, and creating distinct homes for each class.

This was also where I began to Appsmash. The islands on the game website are linked to the grade level houses and leaderboard using "invisible" shapes that act as buttons. The quests inside the houses are linked using interactive Thinglink images. The reasoning for this is simple. I wanted the students to be able to quickly and easily identify the quests they have, without cluttering the images with a lot of text or buttons. By hovering over each icon, students can quickly access the quests they are undertaking without any instructions from me regarding the icon that was used to represent a specific assignment.

XP and Leaderboards:

In my class, students gain experience points (XP) by blogging consistently and by completing the different projects they work on. Whatever you choose for XP, I recommend that you do not tie it to behavior, but rather mastery of skills or concepts. Just like in games and real life, XP does not "go down". Once you gain experience, you never get experience taken away. 

To create the leaderboard(s), I use Google sheets. I previously shared how to create one for a single class. This year, I am adding a leaderboard that functions much the same way, but since I am working with a single storyline, I needed to create one that could rank all my students from different classes and give us a way to compare classes. The following video will show you how.


Quests:

In my project based learning (PBL) environment we have two types of quests. The PBL Quests that culminate in a Boss Battle (i.e. the project product itself) and Mastery Quests. The PBL Quests are created using WIX for the bigger projects or Tackk for smaller assignments. Both allow embedding and manipulation of the color schemes, backgrounds, etc. giving you the opportunity to create a different aesthetic feel for each quest. The PBL Quests are embedded into the class game site and linked through Thinglink.

The Mastery Quests are the worksheets (level 1), quizzes (level 2) and tests (level 3) I use with students.  This simple renaming and leveling of the different types of work, tells the students how they need to prepare, and gets them excited about completing them. Don't you agree that it is much cooler to complete a Mastery Quest Level 3 than to take a test?

To create the first two types of Mastery Quests, I use the capabilities of Wizer.me. Mastery Quests Level 1 usually have links, videos and/or simulations embedded (example) and Level 2 may still have some supports (example). For Level 3, you can still use Wizer.me if you wish to give access to articles or graphs that the students must analyze. For a more "traditional" level 3 Mastery Quest, however, I use Google forms.


I usually do not embed the Mastery Quests in the game website itself, but rather give access to them by posting the individual URLs for the different assignments on our Edmodo stream. Of course, they can be shared in Google classroom or whatever other way you currently have to distribute online work.

Class Currency:

The behavior rewards, if you would like to have them, can be handled in several ways. In the interest of Appsmashing, you could use Class Dojo, and have it embedded into your WIX page. However, that has never really worked for me. I find it cumbersome to walk around with a device and scrolling when I want to assign behavior points. For this I go old-school, and use my school's paper based currency (Patriot Bucks), giving them out as needed. Since they are physical objects, I do not have to create a way to manage them. The "store" is created again using a Thinglink  embedded into the WIX class game page so that students can simply hover over the different items, and check "prices". 

What do you think? Have you tried gamification in your class? Please share your experiences.

Sunday, June 5, 2016

Simulations and the Gamified Classroom

The use of simulations in the classroom is a long-standing tradition. How else could we provide students with high end experiential learning, when our students seldom have access to anything other than basic scientific equipment, and in many cases not even that? If we want want our students to learn how to gather data, analyze it and come up with solutions grounded on evidence we need to provide them with the necessary tools, going beyond the simple inquiry that can be accomplished with household tools.

In the gamified science classroom, tech-based simulations are a handy tool to help us engage students in deep learning. Students can use simulations to develop and use models to predict outcomes. They provide them with data that is directly applicable and transferable to the gamified (and often real-life) scenarios that they are working in. Often, they have the advantage of already looking like a game, making it easy to assign them as part of your gamified experience.

The simulations best suited for a gamified classroom are interactive, animated, provide dynamic feedback, and allow for productive exploration. But, where do you find them?

PhET

PhET, created and maintained by the University of Colorado, Boulder, has hundreds of NGSS aligned simulations, complete with teaching resources. They have been working hard at converting all their sims to HTML, allowing access on any device. Not only that, they are constantly adding new sims.
PhET by NGSS for Middle School
PhET by NGSS for High School


Spongelab

Already completely gamified for you, Spongelab has  thousands of pieces of content that can be searched, organized and annotated. Take a look,  at their Energy Literacy collection as an example of how to integrate SpongeLab in your gamified classroom.


Glencoe Virtual Labs

VIRTUAL LABS offered by the Glencoe textbook company. These labs give the students the adventure of laboratory experimentation without costly supplies, worrisome environmental and safety issues, or time-consuming clean up. They are from all different areas of science: Biology, Physics, Genetics, Earth Science, Physical Science, and Chemistry.


Go-Lab is a EU-based site that allows science teachers access to online labs and inquiry learning applications. The students receive the opportunity to perform personalized scientific experiments with online labs with access to virtual labs, remote labs and data sets. 
Setting up is a little time consuming, but they have a very well done tutorial.


Gizmos

Gizmos is the only paid service on this list. This service provides hundreds of Science (and Math) simulations, aligned to NGSS and searchable by topic, grade level and/or standard. Gizmos allow for manipulation of variables and include graphing tools that help students compare the results of their experiments, creating opportunities to apply the concepts to a variety of scenarios,


Let's take advantage of our students tech skills and allow them to use simulated tools and experiments. Go ahead and incorporate simulations in your gamified classroom. Your students will thank you for the opportunity to use technology, work in groups using sims as a substitute for real-life experiences and develop the skills needed to excel in the 21-century. 

Sunday, May 29, 2016

Gamification Year 2; The Quest Continues


As I am preparing to say goodby to another year of gamifying, I feel the need to write down some of the things that are buzzing in my head, lest I forget them in the summer days ahead. This year completed my year 2 in the gamification arena, and as always some things went well, while others will need a complete rethinking.

Story Lines

This year I worked with four distinct story lines, one at each of the grade levels I teach. They were fun to create, and although the students liked that they each had different avenues, I have to admit that keeping them all working at the same time became rather difficult. I would get ranks and achievements mixed up, and sometimes even directed students to a different story.

As I begin to rethink  and prepare for next year I will be going back to one story line as my main effort, allowing me to also combine some of the other aspects of the gamification experience for my students.

Leaderboards 

The self-ranking leaderboards are in place and served to keep the kids motivated in continuing with the game throughout the year. At times they are still chore to keep updated, but the kids kept me accountable for doing this, as they did check them often, particularly towards the end of the school year as they were looking forward to achieve the highest rank and obtain lofy perk of "Blog Immunity".

This is also where I think having a single storyline will come into play. During this school year, each grade level had their own leaderboard, ranking system, etc. However, I also published for the students the cumulative class ranking. Students were particularly interested in seeing how each class stacked up against each other, and often asked which students were in the lead. In looking forward, I am considering having the individual leaderboards for each class, but also publishing a "top ten", which will be easier to achieve if all classes are working under the same story.

XP

The structure of the game using the blogs as the primary way to get XP worked well, particularly for my upper graders. For the most part, kids blogged consistently about their learning, and we saw a couple of students reach 100 content-related blog post this year. Including the S&EP (as mentioned in my Gamifying the NGSS post) pushed the students to "think like scientists", and provided me with a tangible way to assess them in their progress towards mastery of the practices.

Although the blog points as XP has worked really well, I am re-considering not using their unit tests, performance tasks and projects within the XP structure. The XP has always been about progress towards mastery, and including them in the XP would allow me to encourage the students to perfect their work. It is an easy fix, but it will require a little work on the back end to make sure the playing field is even in regards to points, particularly since these are tied not only to rank but to privileges as well.

Gold Coins

The structure I had in place for obtaining gold coins this year did not work at all. Only three of my 240 students even attempted a cross-cutting "boss battle"(Gamifying the NGSS). When I asked why, the students reported that it was too hard to obtain gold coins, and although I modified the structure several times, by the time the changes came about the students had lost all interest in them. 

As I think about next year, I am considering reverting the gold coins back to simple participation points and displays of good citizenship or behavior, instead of tying them to the content. However, I need to figure out a way to keep the management simple. Walking around with an open app (like Class Dojo) or a spreadsheet has never worked for me. I guess I could create some tokens...

Other gamification things to explore

Escape Rooms: 
Recently I attended the Deeper Learning conference, and participated in an Escape Room experience. I think this has great potential for the gamified classroom, and I invite you to visit some of the things I've found regarding their use in education:


Choose your own adventure videos:
A year ago, my daughter showed me the Interlude tool and I remember thinking how well it could be integrated into a gamified classroom. This video creation tool allows you to design, create and publish an interactive video with relative ease, providing you with a way to enhance your gamified classroom with "choose your own adventure" videos. Unfortunately I forgot all about it until a couple of days ago, and I am sharing it here in case one of you gamifiers wishes take it on as a summer project.

Friday, May 20, 2016

Building a Classroom Website?


Many educators have decided to take the plunge to create their own websites. These websites serve as a central place to compile educational resources for students, communicate expectations, etc. We can think of them almost as interactive "green sheets". Parents can be directed to the class webpage to look at calendars, news from the classroom and upcoming events, while students can look in them to find links to content they may have missed, homework assignments, and even gain access to specific educational resources or web tools recommended by the teacher.

Some districts host teacher websites in their own servers and provide specific tools to be used (Adobe's Dreamweaver for example). However, most often teachers are left to their own devices and their website become a matter of personal preference. With little guidance, teachers choose a particular web creation tool simply because someone they know uses it. However, with the many options out there it is really up to the individual teacher to decide just how they would like their website to represent their classroom.

Google Sites

This is probably the most accessible web page creation tool, especially if you are a GaFE school. It works well simply because it integrates all other GaFE tools. It has the added benefit of allowing you to restrict views to only the individuals within your school or district domain, which for some institutions is a must. However the main disadvantage is that you are very restricted in the look and feel of what is your personal webpage. Google Sites all appear extremely similar. Customizing your navigation or adding anything non-GaFE requires a major investment of time finding tutorials, and the answer is either "It cannot be done" or working with code that, unless you know what you are doing, only makes matters worse. 
If you decide to go Google Sites, visit Mr. Amsler, who kindly published a "Working with Google Sites" web page that serves as a great guide of how and what to do.

Weebly for Education


www.adventurestemprogram.com
Weebly for Education is what a former colleague of mine decided to use for our school website, which means that, as the webpage manager, I now have the "joy" of using it on a consistent basis. Its drag and drop simplicity is a favorite with educators interested in creating a more personal look for their websites. In Weebly the website layout and design are all done for you. If you later decide to change the template, you simply click on the new template and everything is transferred to "where it should be". This seems ideal, right? It can be, but it becomes incredibly limiting when you want to get creative because Weebly only allows you to insert elements into pre-defined areas. Unless you are really handy with code, which Weebly does allow you to modify, you are kind of stuck with their templates. This is the main reason I personally dislike it.

Weebly offers other cool stuff, like the ability to add an assignment form to your site allowing students the ability to upload their assignments and submit them to you via your website. You also have the option to create student accounts so that your students can create their own Weebly websites, all moderated by you.
If you decide to go Weebly, make sure that you create an account using Weebly for Education, as opposed to just Weebly, to gain access to the educator tools. You may also wish to visit educatorstechnology.com to find some good tutorials to help you get started.

WIX


http://mariana68.wix.com/adventurescience 
This is my personal favorite due to its maximum flexibility of design. WIX is a true drag and drop web page creation tool, offering complete customization without any HTML or coding knowledge.  All you have to do is just pick a design that works for you, and swap in your own pictures, text and information. If you are feeling particularly creative, or you do not find something you like, you can choose to start with a blank template add backgrounds, images, text and embed anything anywhere. You literally design your own page with minimal effort. It is worth noting that with WIX you cannot change templates. If you decide that you want to change your look, you will need to change the individual items. 

WIX also has an incredibly comprehensive help center. There are help buttons everywhere, so that if there is ever any doubt on what or how to do something, help is just a click away. You will not need to go a-searching for anything. They have even gone the extra mile and created WixEd a free online education program that teaches Wix users everything they need to know about web page creation.

WIX does not have a dedicated "educator" side, so in some districts you may need to call your IT department before using it in order to have it white-listed. If they need convincing, feel free to show them any of the many sites I have created using the platform. They can be found by clicking on the PBL tab.


I know there are many others. Which one do you use?


Wednesday, May 18, 2016

Student AppSmash - A PBL success story


Many of you may have experienced that gut wrenching moment where, before the students have even begun to understand what the PBL experience they are in entails, they have already opened Google slides. The blank stares I get when I dare ask, "Are you sure that a slide deck is the best way to go?", tell me that they are much more product driven than I hope, and that most have been exposed to the "wrong" answer shown in the image above. Presentation equals slides! This is what has driven me to make sure that my driving questions are as vague as possible, at least with respect to the type of product the students create, which brings me to the real reason behind today's post.

A couple of weeks ago, my students began their exploration in our Interdependence of Organisms unit, which culminated in the students "Convincing the general public to care about an endangered species, and developing a realistic plan to bring it back from the brink of extinction".  As always my students launched into "presentation" mode, which was when I officially stated that I was incredibly tired of sitting through slides, so anyone "caught" even thinking about creating a slide deck without a storyboard would lose their tech. I then added that I expected to be entertained, because "no one cares about what is being presented if they are bored, so if the goal was to convince people to care, boring them to tears with slides was definitely not the way to go". What followed was a flurry of student engagement that culminated in one of my favorite student app-smashes of all time - the AyeAye Need You website

http://goo.gl/Z5LVrb


The Aye Aye Need you WIX website includes a student produced screencast-o-matic video, two Thinglinks (one of them used simply as a presentation aid), a HSTRY timeline and a Piktochart infographic.

I unfortunately did not think to record the students' presentation of their work, but their recovery plan included comments like:

- The US and Madagascar are not "besties", so they will need to put aside their differences and work together to restore the forest.

-  Why do we need charcoal? That just pollutes the air. What we need is more Aye-Aye's!


Did the student's achieve the goal of raising awareness, driving action and starting conversations to save the lowly Aye Aye? Yes.
Did they use technology to do it? Yes.
Did they "make a Google slide deck"? Most certainly not.

Now, on to the next step in this PBL evolution - guiding students to develop empathy for the user of a product before even thinking about what the product is/should look like/do.


Friday, May 13, 2016

PBL Toolkit


What do you do when your administrator asks you to show your colleagues how to develop and run PBL projects? Once the meltdown is over, and you have had time to mull things over, you compile a list what you consider your best tools. Here goes:


Project Ideas:

This is really the hardest part, especially when you are just starting out. In the beginning, as you familiarize yourself with the process, your best bet is to use BIE's project searchEdmodo Spotlight or even my own PBL page. Find something you like and that you are willing to do. Know that it will not be pretty the first time around (or the second or third). Trust in the process knowing that once you have run a couple of experiences you will start to feel comfortable and even decide to create one from scratch. When you reach that point, you will start seeing opportunities everywhere. You will find yourself reading an article or thinking about an experience through the lens of, "I wonder what my students could come up with to ...". That is when you are ready to meet with your fellow educators, and develop one you can call your own.

Standards:

Yes, of course you will have to think about your standards. See where that nugget of an idea you had could fit. Truth be told, any PBL experience you create can hit on many standards. The trick is to decide which one you will be teaching explicitly. Don't fall into the trap of simply stating the standard. Decide in advance how your students are going to show mastery of the standard and make plans to point your workshops and activities to address the specifics of the standards.


The Driving Question: 

This is the root of your project, and BIE has graciously shared a handy tool to help with that. They call it the Tubric, and it boils down to something along the lines of:
"How can we as ___ create a way to ____ for ___ in order to address/do/change ___.

Now that you have your project idea, your standards and your driving question, it is time to develop your project. This is where the fun begins.

Entry event: 

Nothing beats a video to catch the student's attention. Thankfully most districts have now decided that YouTube is not the root of all evil. However there are still steps that can be taken to reduce distractions when presenting a YouTube video. Use tools like SafeshareTV or ViewPure to remove comments, advertisements, sidebars, etc.
A novel idea that can be used as an entry event and as a way to encourage deep need to knows is having students participate in a StunConference - a student-led unconference. This takes more time and preparation than showing a video, but it does have the benefit of greater student engagement with the project.

Need to knows: 

These can be collected by the students on Google docs (or in their notebooks). But what about group need to knows that can be easily shared and added to by the whole class? For this, I like to use Padlet and more recently Verso. Both of these remove the stress of students trying to come up with the "perfect" need to know, by allowing them to add and respond long after the project run began. They can also access the tools from any device, so if a new need to know pops up in their head later (while at the store for example), it is simply a matter a few clicks and the idea is added.


Workshops and activities: 

Whether you plan them way in advance or as a response to the needs of your students, you can curate your materials for easy access by your students in platforms such as LessonPaths or Blendspace. For your visual learners, or simply because it is more fun, you may want to create interactive images using Thinglink.


Project page: 

This is where you communicate expectations, as well as host all of the materials your students will need, including the rubrics. You want something that is easy to access and offers flexibility should you need to add things "on the fly" with a minimum of disruption. For me, the answer is WIX, a web page creation platform that allows you to add practically anything, anywhere. If you have never used it, choose from one of their templates. As you become more and more familiar, be bold and create your project pages from scratch. With a little bit of knowledge regarding iframes, you can embed anything without having to worry about figuring out whether what you want to add has an embed code or not. I have used some other tools that also deserve a mention due to their shallow learning curve: Tackk and HSTRY. Both of these are a bit more linear, and have limitations in what can be embedded directly, but for some groups of students this is a "good thing".

Managing a project run: 

Everybody is working on their project, or are they? How do your students communicate their daily activities with you, and how do you manage all those groups without going crazy? It is as simple as Trello, a project management tool that updates in real time, and allows every member of each team to share exactly what they are doing, upload materials, share information, etc. It also provides a space for direct teacher feedback during the run, eliminating the fear of facing a "what did you do all this time?" moment come presentation day. If you want to know more about how I use it, you may want to visit my previous post.


Presentations and Exhibitions: 

Make use of the Ignite format during presentations, or better yet host student exhibitions.


Rubrics and Feedback: 

Your students are done, and have successfully presented their projects. You still have to figure out a way to provide feedback and give access to the graded rubrics. Yes, you can use paper or you can create individual documents and e-mail them to the students. It is a chore no one likes. Thankfully, ForAllRubrics has come to the rescue. Whether you use it as a stand alone product, or as I do within Edmodo, this badging and rubric platform allows you to grade and send the rubrics to your students with just a few clicks.


Reflection:

What is PBL without reflection? Just another project... Invite your students to reflect on their work by having them use this set of questions using Blogger as their platform.


Dive into PBL. Your students will thank you for it.


Thursday, April 28, 2016

PBL - Project Management Made Easier with Trello


A while back I posted some ideas on how to keep the students on track during a PBL run (PBL - Avoiding the pitfalls of "Doing Research"). I've been working with several iterations of the Project Timetable, Daily Project Work Report and Project Management Sheet with some success, but my students and I still struggle with some of the finer points of PBL management in the classroom.

You see, some of my students hear project and immediately jump up to get scissors and glue, while others get a computer and open Google slides. Often I find myself saying, "You don't even know what the project is about and you are already thinking about the final product?" So the question continues, "How can I help students visualize the steps needed to successfully complete a project run without micro-managing?", and more importantly, "How can I see where everyone is at any given time?" I think I may have found the answer in Trello.

Trello is a free project management tool. The interface is simple. You create a board, which is really a list of lists, filled with cards. The cards can include pictures, attachments, checklists, labels and due dates. These cards can be moved around and edited all members of a board. Basically anything that you would need to know about a project run can be added to the board.

Here is how I am using it for my PBL runs:

  1. I create an assignment board master and make it public. The master includes the assignment, specific links I want to share, expected due dates, etc. 
  2. The "press secretary" from each team creates a copy my board master, and shares it with his/her teammates and myself.
  3. As students work on the project run, they update the board, moving the cards from "To do" to "Doing" to "Done", and add the evidence of their work. They can add links, pictures, documents, you name it!
  4. Things in the  "Done" list can be opened  by me to provide feedback. I can  even move things back to the "Doing" for revision. The board is updated in real time, so any time anything happens the students have the "latest" information.


Trello does not have to be only for PBL. Read what Melanie Pinola has to say about Trello. And no, I am not affiliated with Trello in any way. It simply has allowed me and my students to become better at this PBL business.

Sunday, April 10, 2016

The End is Nigh


The end of the school year is upon us. Students are dreaming about that long summer vacation. Behaviour issues are on the rise. You are asking yourself, what can I do to keep students engaged? How can I recap what was learned and end my school year strong?

Below are some of the assignments that I use:


I would love to add to these. What are some of the things you do to keep your students learning until the last day?

Saturday, April 9, 2016

StunConference - A Student Led Unconference


If you are an educator you have probably have heard of un-conferences. Maybe you have even attended a couple. You might have even toyed with the idea of doing one with students, especially if you are a project based teacher. After all, they kind of feel a little like the "need to know" discussions you have after your entry event.

However, the logistics  seem daunting. Where are you going to hold it? How are you going to keep students on track? Do you really have the time? What if the students do not buy into it? What if a session creator gets no participants? These are the questions that good friends and masterful educators Samantha McMillan and Melissa Garcia had a couple of months ago when they decided to "Just do it". Today, I was in Samantha's class and witnessed what I had thought impossible: A 6th grade student led un-conference.

So, what did it look like? Engagement and deep conversation centered around "Imagine the Future". All students were:
- Participating
- On task
- Holding each other accountable
- Learning from each other
It was a teacher's dream.

Now for the tricky part. How do you achieve this?

Your break-out sessions do not need to be separated by walls. Student led un-conferences can be done in a regular classroom. You just need to have students sit together. It will get loud, but not much louder than in any group activity.

Decide on an un-topic conference appropriate for the students. It should be broad enough and interesting to the students. Start with a topic that inspires conversation: Imagine the Future (today's topic), College, Immigration, Equality. You know, the small stuff.
 
Provide students with some time (whether in class or out) to come up with break-out session ideas. Have the "Session Wall" posted for a couple of days at least. It does not have to be fancy, some butcher paper and post-its will do. Make sure you emphasize that not all students need to create a session. Have them read the session wall before adding topics. Remind them that if they want to lead a session that is already posted they can simply participate.

Prepare the students. Explain the structure. Go over the norms. Emphasize collaboration. Here is the website Samantha used with her students for today's topic: StunConferenceAdVENTURE (Be aware that some of her links are specific to her class, so they will not work for you).
With her permission, I have tweaked it into a generic one that you can use in your class, with specific ties to PBL - to make your own copy of the documents open them in Google drive and click File>make a copy. 


The day of the un-conference, take a deep breath and step back. Visit the different break-out sessions as a participant. Above all, avoid taking over. Trust your students and see them soar.


If you are wondering about the electronics, that is where their note-taking documents are.
I invite you to try it out. You will not be disappointed. If you do, tweet it out using #StunConference. 

Sunday, March 27, 2016

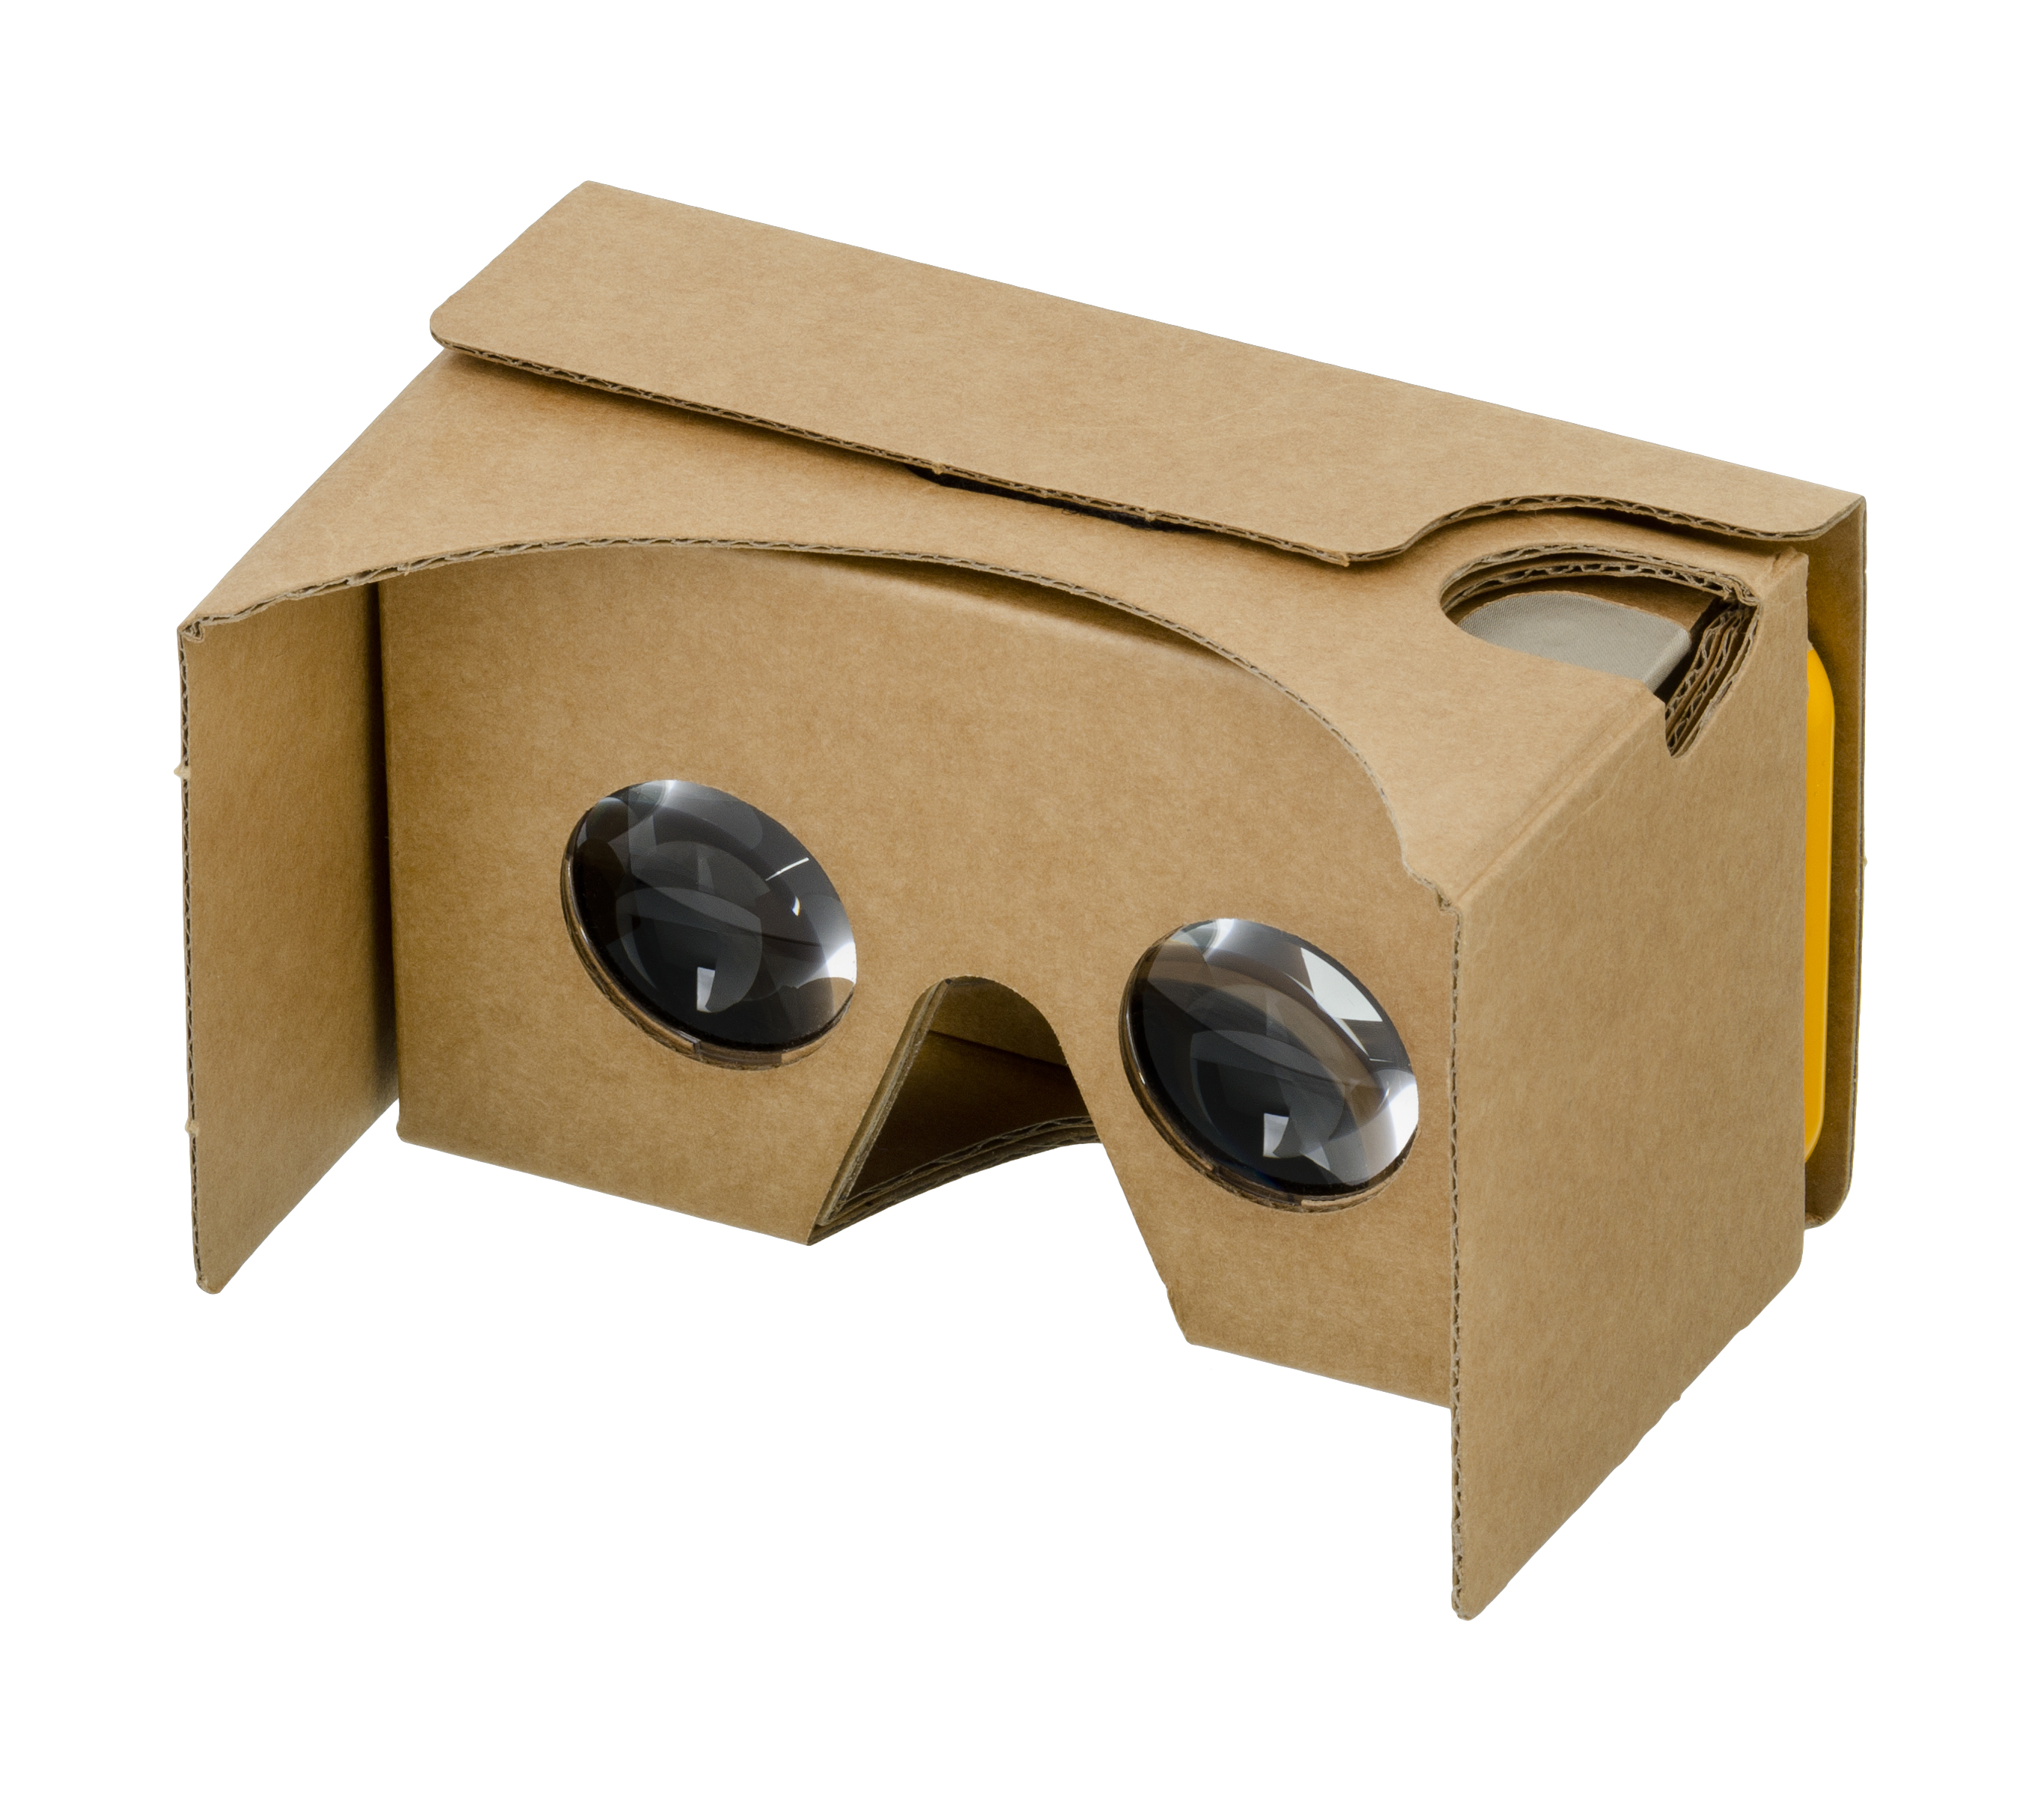
Appsmash: Google cardboard +Tinkercad+Sketchfab


I am going to be totally honest here. When I first heard about Google Cardboard I figured that this was not for me. What could this contraption actually provide for my students that a video could not do? However, all that changed for me while attending the DeeperLearning Conference and landing, almost by mistake, in Carrie Lawrence's "Virtual Reality in Education using Google Cardboard" workshop.

We started with what I thought Google Cardboard was all about. Giving access to far away or impossible places that are now at our student's fingertips. Having never done the VR thing, that in itself was actually quite fun, and the apps she shared were cool. Here are some of the sites she shared and a couple more that I found after the session (all for Android, but I'm sure you can find the same or similar ones in the Apple store). Disclaimer, several of these work better on some devices than others, but don't let that deter you; find one or two that work for your device. Many more are being published.


VR Apps (Android), by mrsgarciaserrato

Now, if you have read my blog before, you know that I am more of a "student create stuff" kind of teacher. I liked the idea, but I was still not particularly enthused. However all of that changed an instant later when she began talking about 3D modeling. You see, there are a couple of tools that when used together enable students to create VR 3D models. This is how it goes:

It starts by you assigning a project that results in a digital 3D model. For example, my eco-house project.


Your students create their model in Tinkercad. This would be my go to since it is free, but I am assuming that other options would work (SketchUp or Minecraft). The limitation is really that the "output" needs to be compatible with our next step.
If using Tinkercad, once your students are done, they would click on Download for 3D printing, and select either .STL, .OBJ or .VRML.


That was the hard part. The next step is simply to upload the file to Sketchfab.


The students can tinker with it some, following these helpful tips from Sketchfab so the VR experience they create is "just right".

And just like that, the students, their parents and yourself can now use Google cardboard to virtually walk all around their model!


Google cardboard can be bought for around $10.00 from Google or Amazon (search for Google cardboard), and they work with any smartphone and even iPod touch devices. Students will also need to create accounts in both Tinkercad and Sketchfab (both free), but check with your IT first to verify that they are whitelisted.


Two additional "mini-hacks" before I go:

- Add a rubber band to the "crease" where the phone goes to prevent it from slipping out.
- Make sure you take the phone out of its case. This allows the use of the "trigger".


Get your "Google Cardboard" on!